The best scenario is that, in case of a database failure, you have a good Disaster Recovery Plan (DRP) and a highly available environment with an automatic failover process, but… what happens if it fails for some unexpected reason? What if you need to perform a manual failover? In this blog, we’ll share some recommendations to follow in case you need to failover your database.
Verification Checks
Before performing any change, you need to verify some basic things to avoid new issues after the failover process.
Replication Status
It could be possible that, at the failure time, the slave node is not up-to-date, due to a network failure, high load, or another issue, so you need to make sure your slave has all (or almost all) the information. If you have more than one slave node, you should also check which one is the most advanced node and choose it to failover.
e.g: Let’s check the replication status in a MariaDB Server.
MariaDB [(none)]> SHOW SLAVE STATUS\G

*************************** 1. row ***************************

Slave_IO_State: Waiting for master to send event

Master_Host: 192.168.100.110

Master_User: rpl_user

Master_Port: 3306

Connect_Retry: 10

Master_Log_File: binlog.000014

Read_Master_Log_Pos: 339

Relay_Log_File: relay-bin.000002

Relay_Log_Pos: 635

Relay_Master_Log_File: binlog.000014

Slave_IO_Running: Yes

Slave_SQL_Running: Yes

Last_Errno: 0

Skip_Counter: 0

Exec_Master_Log_Pos: 339

Relay_Log_Space: 938

Until_Condition: None

Until_Log_Pos: 0

Master_SSL_Allowed: No

Seconds_Behind_Master: 0

Master_SSL_Verify_Server_Cert: No

Last_IO_Errno: 0

Last_SQL_Errno: 0

Replicate_Ignore_Server_Ids:

Master_Server_Id: 3001

Using_Gtid: Slave_Pos

Gtid_IO_Pos: 0-3001-20

Parallel_Mode: conservative

SQL_Delay: 0

SQL_Remaining_Delay: NULL

Slave_SQL_Running_State: Slave has read all relay log; waiting for the slave I/O thread to update it

Slave_DDL_Groups: 0

Slave_Non_Transactional_Groups: 0

Slave_Transactional_Groups: 0

1 row in set (0.000 sec)
In case of PostgreSQL, it’s a bit different as you need to check the WALs status and compare the applied to the fetched ones.
postgres=# SELECT CASE WHEN pg_last_wal_receive_lsn()=pg_last_wal_replay_lsn()

postgres-# THEN 0

postgres-# ELSE EXTRACT (EPOCH FROM now() - pg_last_xact_replay_timestamp())

postgres-# END AS log_delay;

 log_delay

-----------

         0

(1 row)
Credentials
Before running the failover, you must check if your application/users will be able to access your new master with the current credentials. If you are not replicating your database users, maybe the credentials were changed, so you will need to update them in the slave nodes before any changes.
e.g: You can query the user table in the mysql database to check the user credentials in a MariaDB/MySQL Server:
MariaDB [(none)]> SELECT Host,User,Password FROM mysql.user;

+-----------------+--------------+-------------------------------------------+

| Host            | User | Password                                  |

+-----------------+--------------+-------------------------------------------+

| localhost       | root | *CD7EC70C2F7DCE88643C97381CB42633118AF8A8 |

| localhost       | mysql | invalid                                   |

| 127.0.0.1       | backupuser | *AC01ED53FA8443BFD3FC7C448F78A6F2C26C3C38 |

| 192.168.100.100 | cmon         | *F80B5EE41D1FB1FA67D83E96FCB1638ABCFB86E2 |

| 127.0.0.1       | root | *CD7EC70C2F7DCE88643C97381CB42633118AF8A8 |

| ::1             | root | *CD7EC70C2F7DCE88643C97381CB42633118AF8A8 |

| localhost       | backupuser | *AC01ED53FA8443BFD3FC7C448F78A6F2C26C3C38 |

| 192.168.100.112 | user1        | *CD7EC70C2F7DCE88643C97381CB42633118AF8A8 |

| localhost       | cmonexporter | *0F7AD3EAF21E28201D311384753810C5066B0964 |

| 127.0.0.1       | cmonexporter | *0F7AD3EAF21E28201D311384753810C5066B0964 |

| ::1             | cmonexporter | *0F7AD3EAF21E28201D311384753810C5066B0964 |

| 192.168.100.110 | rpl_user     | *EEA7B018B16E0201270B3CDC0AF8FC335048DC63 |

+-----------------+--------------+-------------------------------------------+

12 rows in set (0.001 sec)
In case of PostgreSQL, you can use the ‘\du’ command to know the roles, and you must also check the pg_hba.conf configuration file to manage the user access (not credentials). So:
postgres=# \du

                                       List of roles

    Role name     |             Attributes         | Member of

------------------+------------------------------------------------------------+-----------

 admindb          | Superuser, Create role, Create DB                          | {}

 cmon_replication | Replication                                                | {}

 cmonexporter     |                                             | {}

 postgres         | Superuser, Create role, Create DB, Replication, Bypass RLS | {}

 s9smysqlchk      | Superuser, Create role, Create DB                          | {}
And pg_hba.conf:
# TYPE DATABASE USER ADDRESS METHOD

host replication  cmon_replication  localhost  md5

host  replication  cmon_replication  127.0.0.1/32  md5

host  all  s9smysqlchk  localhost  md5

host  all  s9smysqlchk  127.0.0.1/32  md5

local   all            all                   trust

host    all            all 127.0.0.1/32 trust
Network/Firewall Access
The credentials are not the only possible issue accessing your new master. If the node is in another datacenter, or you have a local firewall to filter traffic, you must check if you are allowed to access it or even if you have the network route to reach the new master node.
e.g: iptables. Let’s allow the traffic from the network 167.124.57.0/24 and check the current rules after adding it:
$ iptables -A INPUT  -s 167.124.57.0/24 -m state --state NEW  -j ACCEPT

$ iptables -L -n

Chain INPUT (policy ACCEPT)

target     prot opt source               destination

ACCEPT     all -- 167.124.57.0/24      0.0.0.0/0 state NEW

Chain FORWARD (policy ACCEPT)

target     prot opt source               destination

Chain OUTPUT (policy ACCEPT)

target     prot opt source               destination
e.g: routes. Let’s suppose your new master node is in the network 10.0.0.0/24, your application server is in 192.168.100.0/24, and you can reach the remote network using 192.168.100.100, so in your application server, add the corresponding route:
$ route add -net 10.0.0.0/24 gw 192.168.100.100

$ route -n

Kernel IP routing table

Destination     Gateway Genmask         Flags Metric Ref Use Iface

0.0.0.0         192.168.100.1 0.0.0.0         UG 0 0 0 eth0

10.0.0.0        192.168.100.100 255.255.255.0   UG 0 0 0 eth0

169.254.0.0     0.0.0.0 255.255.0.0     U 1027 0 0 eth0

192.168.100.0   0.0.0.0 255.255.255.0   U 0 0 0 eth0
Action Points
After checking all the mentioned points, you should be ready to make the actions to failover your database.
New IP Address
As you will promote a slave node, the master IP address will change, so you will need to change it in your application or client access.
Using a Load Balancer is an excellent way to avoid this issue/change. After the failover process, the Load Balancer will detect the old master as offline and (depends on the configuration) send the traffic to the new one to write on it, so you don’t need to change anything in your application.
e.g: Let’s see an example for an HAProxy configuration:
listen  haproxy_5433

        bind *:5433

        mode tcp

        timeout client  10800s

        timeout server  10800s

        balance leastconn

        option tcp-check

        server 192.168.100.119 192.168.100.119:5432 check

        server 192.168.100.120 192.168.100.120:5432 check
In this case, if one node is down, HAProxy won’t send traffic there and send the traffic only to the available node.
Reconfigure the Slave Nodes
If you have more than one slave node, after promoting one of them, you must reconfigure the rest of the slaves to connect to the new master. This could be a time-consuming task, depending on the number of nodes.
Verify & Configure the Backups
After you have all in place (new master promoted, slaves reconfigured, application writing in the new master), it is important to take the necessary actions to prevent a new issue, so backups are a must in this step. Most probably you had a backup policy running before the incident (if not, you need to have it for sure), so you must check if the backups are still running or they will do in the new topology. It could be possible that you had the backups running on the old master, or using the slave node that is master now, so you need to check it to make sure your backup policy will still work after the changes.
Database Monitoring
When you perform a failover process, monitoring is a must before, during, and after the process. With this, you can prevent an issue before it gets worse, detect an unexpected problem during the failover, or even know if something goes wrong after it. For example, you must monitor if your application can access your new master by checking the number of active connections.
Key Metrics to Monitor
Let’s see some of the most important metrics to take into account:
- Replication Lag
- Replication Status
- Number of connections
- Network usage/errors
- Server load (CPU, Memory, Disk)
- Database and system logs
Rollback
Of course, if something went wrong, you must be able to roll back. Blocking traffic to the old node and keeping it as isolated as possible could be a good strategy for this, so in case you need to rollback, you will have the old node available. If the rollback is after some minutes, depending on the traffic, you will probably need to insert the data of these minutes in the old master, so make sure you have also your temporary master node available and isolated to take this information and apply it back.
Automate Failover Process with ClusterControl
Seeing all these necessary tasks to perform a failover, most probably you want to automate it and avoid all this manual work. For this, you can take advantage of some of the features that ClusterControl can offer you for different database technologies, like auto-recovery, backups, user management, monitoring, among other features, all from the same system.
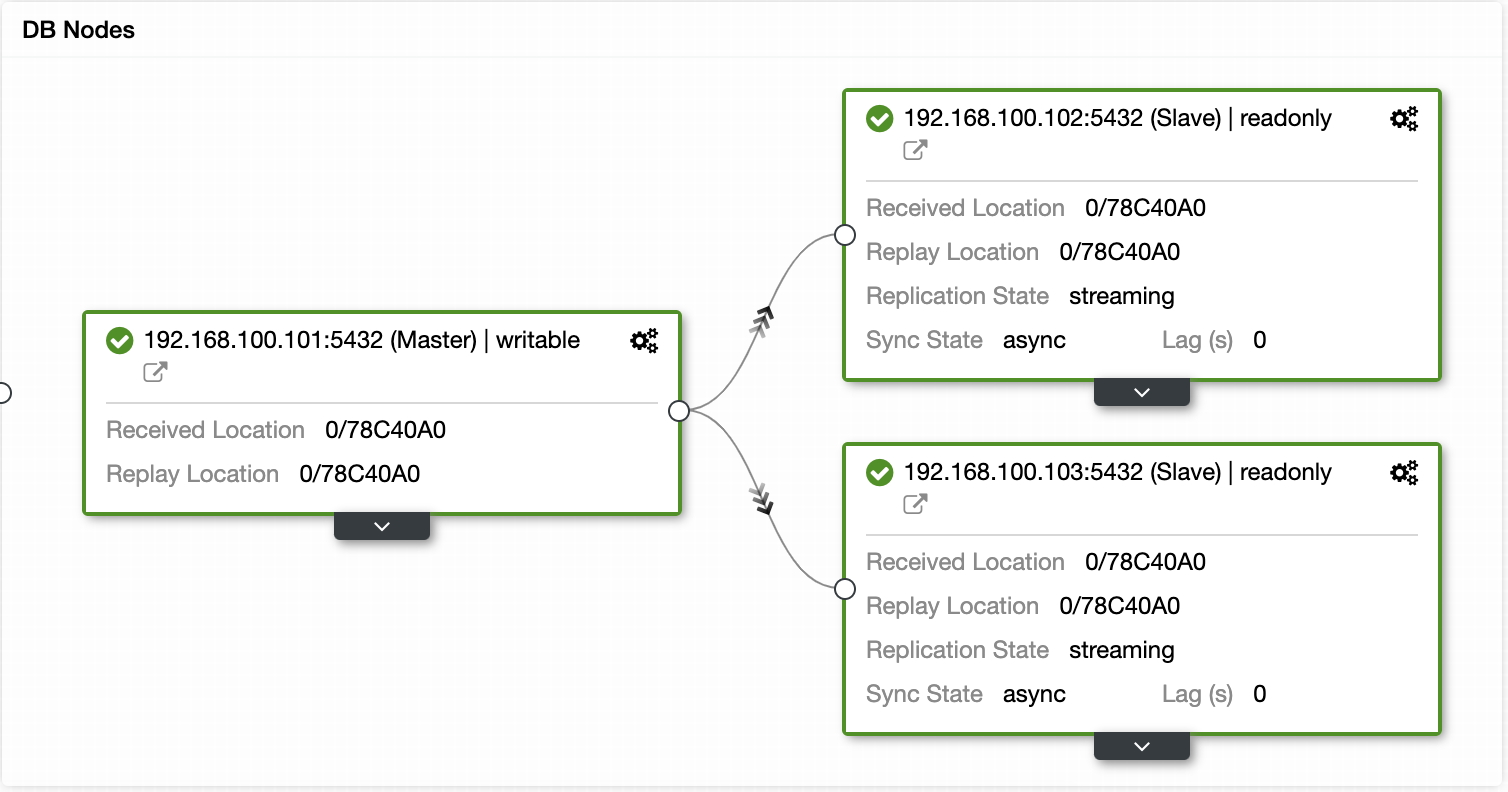
With ClusterControl you can verify the replication status and its lag, create or modify credentials, know the network and host status, and even more verifications.
Using ClusterControl you can also perform different cluster and node actions, like promote slave, restart database and server, add or remove database nodes, add or remove load balancer nodes, rebuild a replication slave, and more.

Using these actions you can also rollback your failover if needed by rebuilding and promoting the previous master.
ClusterControl has monitoring and alerting services that help you know what is happening or even if something happened previously.
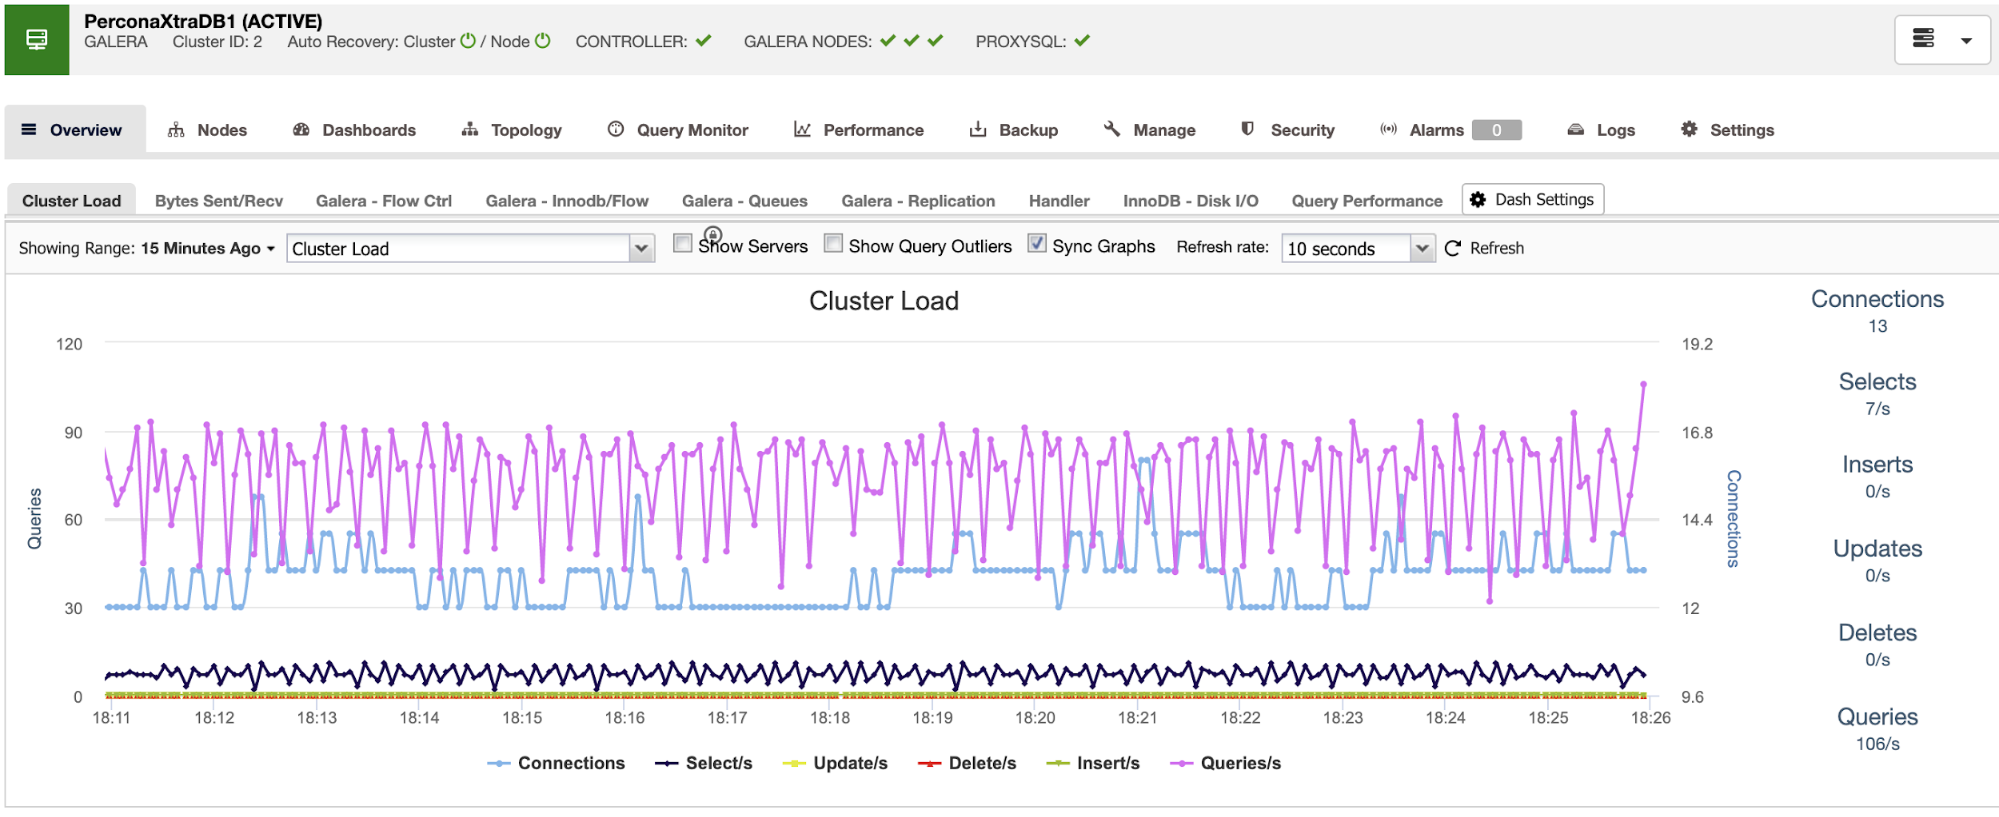
You can also use the dashboard section to have a more user-friendly view about the status of your systems.
Conclusion
In case of a master database failure, you will want to have all the information in place to take the necessary actions ASAP. Having a good DRP is the key to keep your system running all (or almost all) the time. This DRP should include a well-documented failover process to have an acceptable RTO (Recovery Time Objective) for the company.